Lessons from Art School: Film Photography Nostalgia
One of the things I pride myself on as a professional photographer is that I am fully trained and educated in my field. While many photographers today are self taught and have no degrees or certifications in their craft – I actually went to college and double majored in photography and graphic design. Now I’m by no means suggesting that you have to do that – but it does mean that my clients can be confident in the quality of work they will receive from me.
When I started college – the first couple classes you were required to take were all film photography based. There were digital cameras out when I was in college, but my professors believed that the best way to truly learn and understand your camera was to shoot film. And I have to admit – it did force you to become really aware of your settings and the details of your camera. You didn’t have a screen to look at and check to be sure it looked okay. All you had was your camera, your settings, sometimes a light meter, and the scene in front of you.
And with film photography, the only way to find out if you got it right was to develop your film and check the negatives. Someone who wasn’t taking the time to really learn their camera would waste roll upon roll of film with sloppy camera work. But those who took the time to really understand the settings ended up gradually fine tuning every detail of how they worked.
I have to tell you – I miss those days. The days of being given an assignment… a theme or idea. Something our professor wanted us to convey. And then grabbing my old Minolta camera and spending an entire day out shooting. Gathering up my film and heading into the dark room. Our dark room was in the basement – no light can come into the room so it was very cool and dark and with the chemical washes – the sounds of water were incredibly calming. I loved being in there at night because you were more likely to have the space to yourself… I spent so much time in that room!
We had this little closet you would go into. There were two of them side by side. They were nothing more than a tiny room with a door and a shelf at standing height for you to set your things down on. I quickly memorized that space. Where everything was in that tiny little room. Because that room was pitch black. You walked in and shut the door and then you had to rely entirely on your sense of touch while you were in that space to complete your task without damaging your film. I learned how to remove my film, thread it perfectly into the spiral groves of the spool, and slide that into the canister for processing. It became motor memory. A natural process and movement.

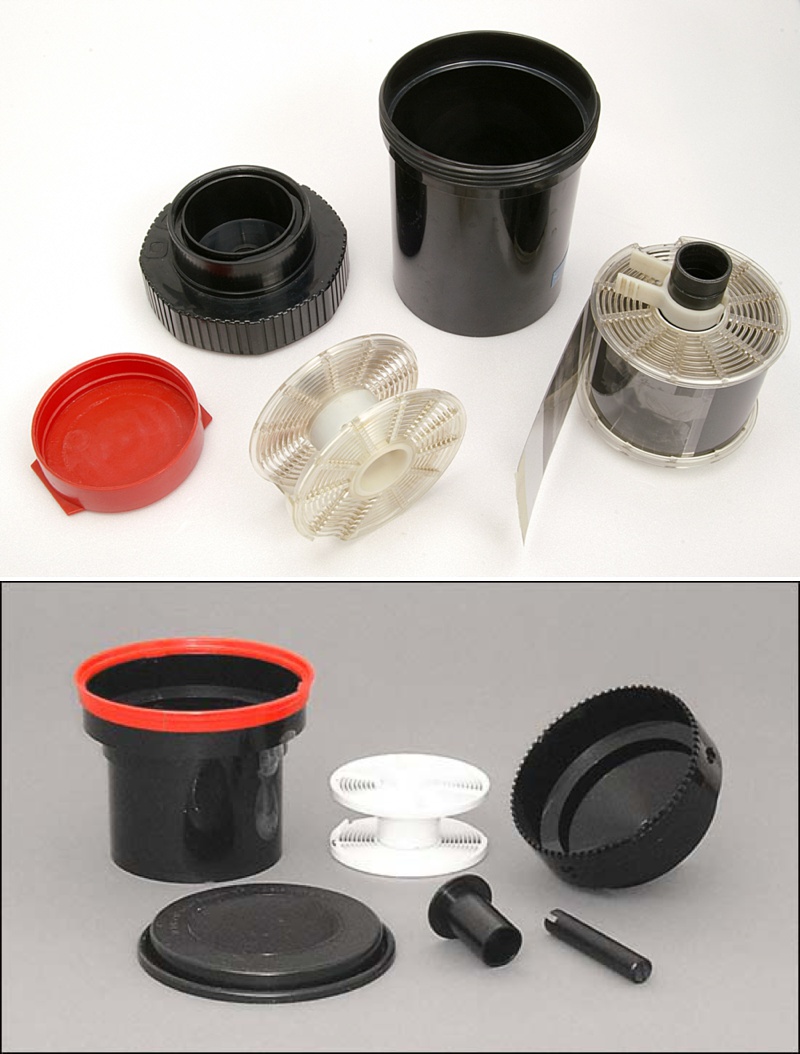
Once that was complete you’d take your little canister into the film developing area in the lab, which was a much more brightly lit room with counters, timers, and sinks. Here you’d measure out your chemicals: your developer, stop bath, fixative, wash and your wetting agent. You made sure you had everything ready because once you started – you could not stop. You’d pour in each solution for it’s specified amount of time and agitate as required. Even knowing that if you missed a step or did this wrong – you’d ruin your film – this process was still felt relaxing to me. It was a formula… follow these steps… do these things… treat your film with love and watch it develop. Below I’m putting a video of this process in case you’re curious because I really did love doing this:
And guys – that’s just the process to develop the film… just to see what you actually shot with your camera. That doesn’t get you a finished print… that’s just those little transparent negatives. But it’s beautiful and brilliant and just one more piece in the puzzle of the love that goes into creating film photography!
From there you have to go through all those little negatives and find your good ones. The ones that are worthy of being printed. Because for most of our assignments – you were only showing one for critique. Sometimes you’d test print a few to decide which one turned out best… but ultimate you only need one really good one that captured the theme or idea for that assignment.
After selecting the negative you’d go back into the dark room and take your negative to your favorite Enlarger, which is basically a machine that exposes photo paper to light. This would be how you would transfer the image from your negative to your paper. This… was old school photoshop. You had filters you could use to alter your contrast. You could dodge and burn. You could overlay different negatives… In the old days – this was where the magic happened. The more time your print spent exposed to light in that Enlarger – the darker your image would be.
Immediately after working your magic with the Enlarger – you would take your print to the wash baths. Just like before you have four solutions to run your prints through: the Developer, the Stop Bath, the Fixer, and then your rinse. Just like before with your negatives, the timing for transferring your print from one bath to the next is crucial to the development of the photo. But again – this process was so calming. You’d sit with the Enlarger and create and then methodically work your way through the chemical baths to create your print.
Here’s another video I found that walks through the whole process:
Now obviously I’m not discrediting the level of skill and love that go into photography now. I feel like I put a lot of love into my artwork still… But can you see the difference? This… this is when I truly and madly fell in love with photography. Because you weren’t just snapping some pictures on your phone or your camera… you were CREATING something. You had learned the ins and outs of your craft and you were using all that knowledge to capture something beautiful or important or to relay a message.
I think this is why I love my fine art work so much. Because now in the digital era – this is my version of getting back to my roots. Getting back to what I loved… carefully crafting. Take the time to lovingly build a beautiful piece of art. Creating in a way the common man can’t. I obviously love capturing portraits for my seniors and my families. In those sessions I put all my love into the front side… getting to know my clients and reflect who they are in my pictures. I create during the session and polish it up in post. But in my fine art work I get to build layer upon layer… adding new pieces here, placing light, adding shadows, molding a space into it’s own little world.
But I’ll be honest – I still miss those dark room days. Those days of learning. Of working diligently to complete an assignment and get the best critique. The quiet calm of creating every little detail of that photograph. Late nights standing in the dark watching a white piece of paper slowly start to come to life… There really is something beautiful about watching something gradually grow out of literally nothing.
 Previous post
Packaging with Love

